Behind our simple, stout, modest home someone, sometime in the 70’s, built a 300 square foot addition. There’s a lot to say about the addition, but this post is about the foundation of the addition: the crawlspace. This crawlspace is about 4′ high, with poured concrete walls and a dirt floor. As crawlspaces go, it’s not too bad. it would have been a lot tidier if the dryer hadn’t been venting into that space for who-knows-how-long.
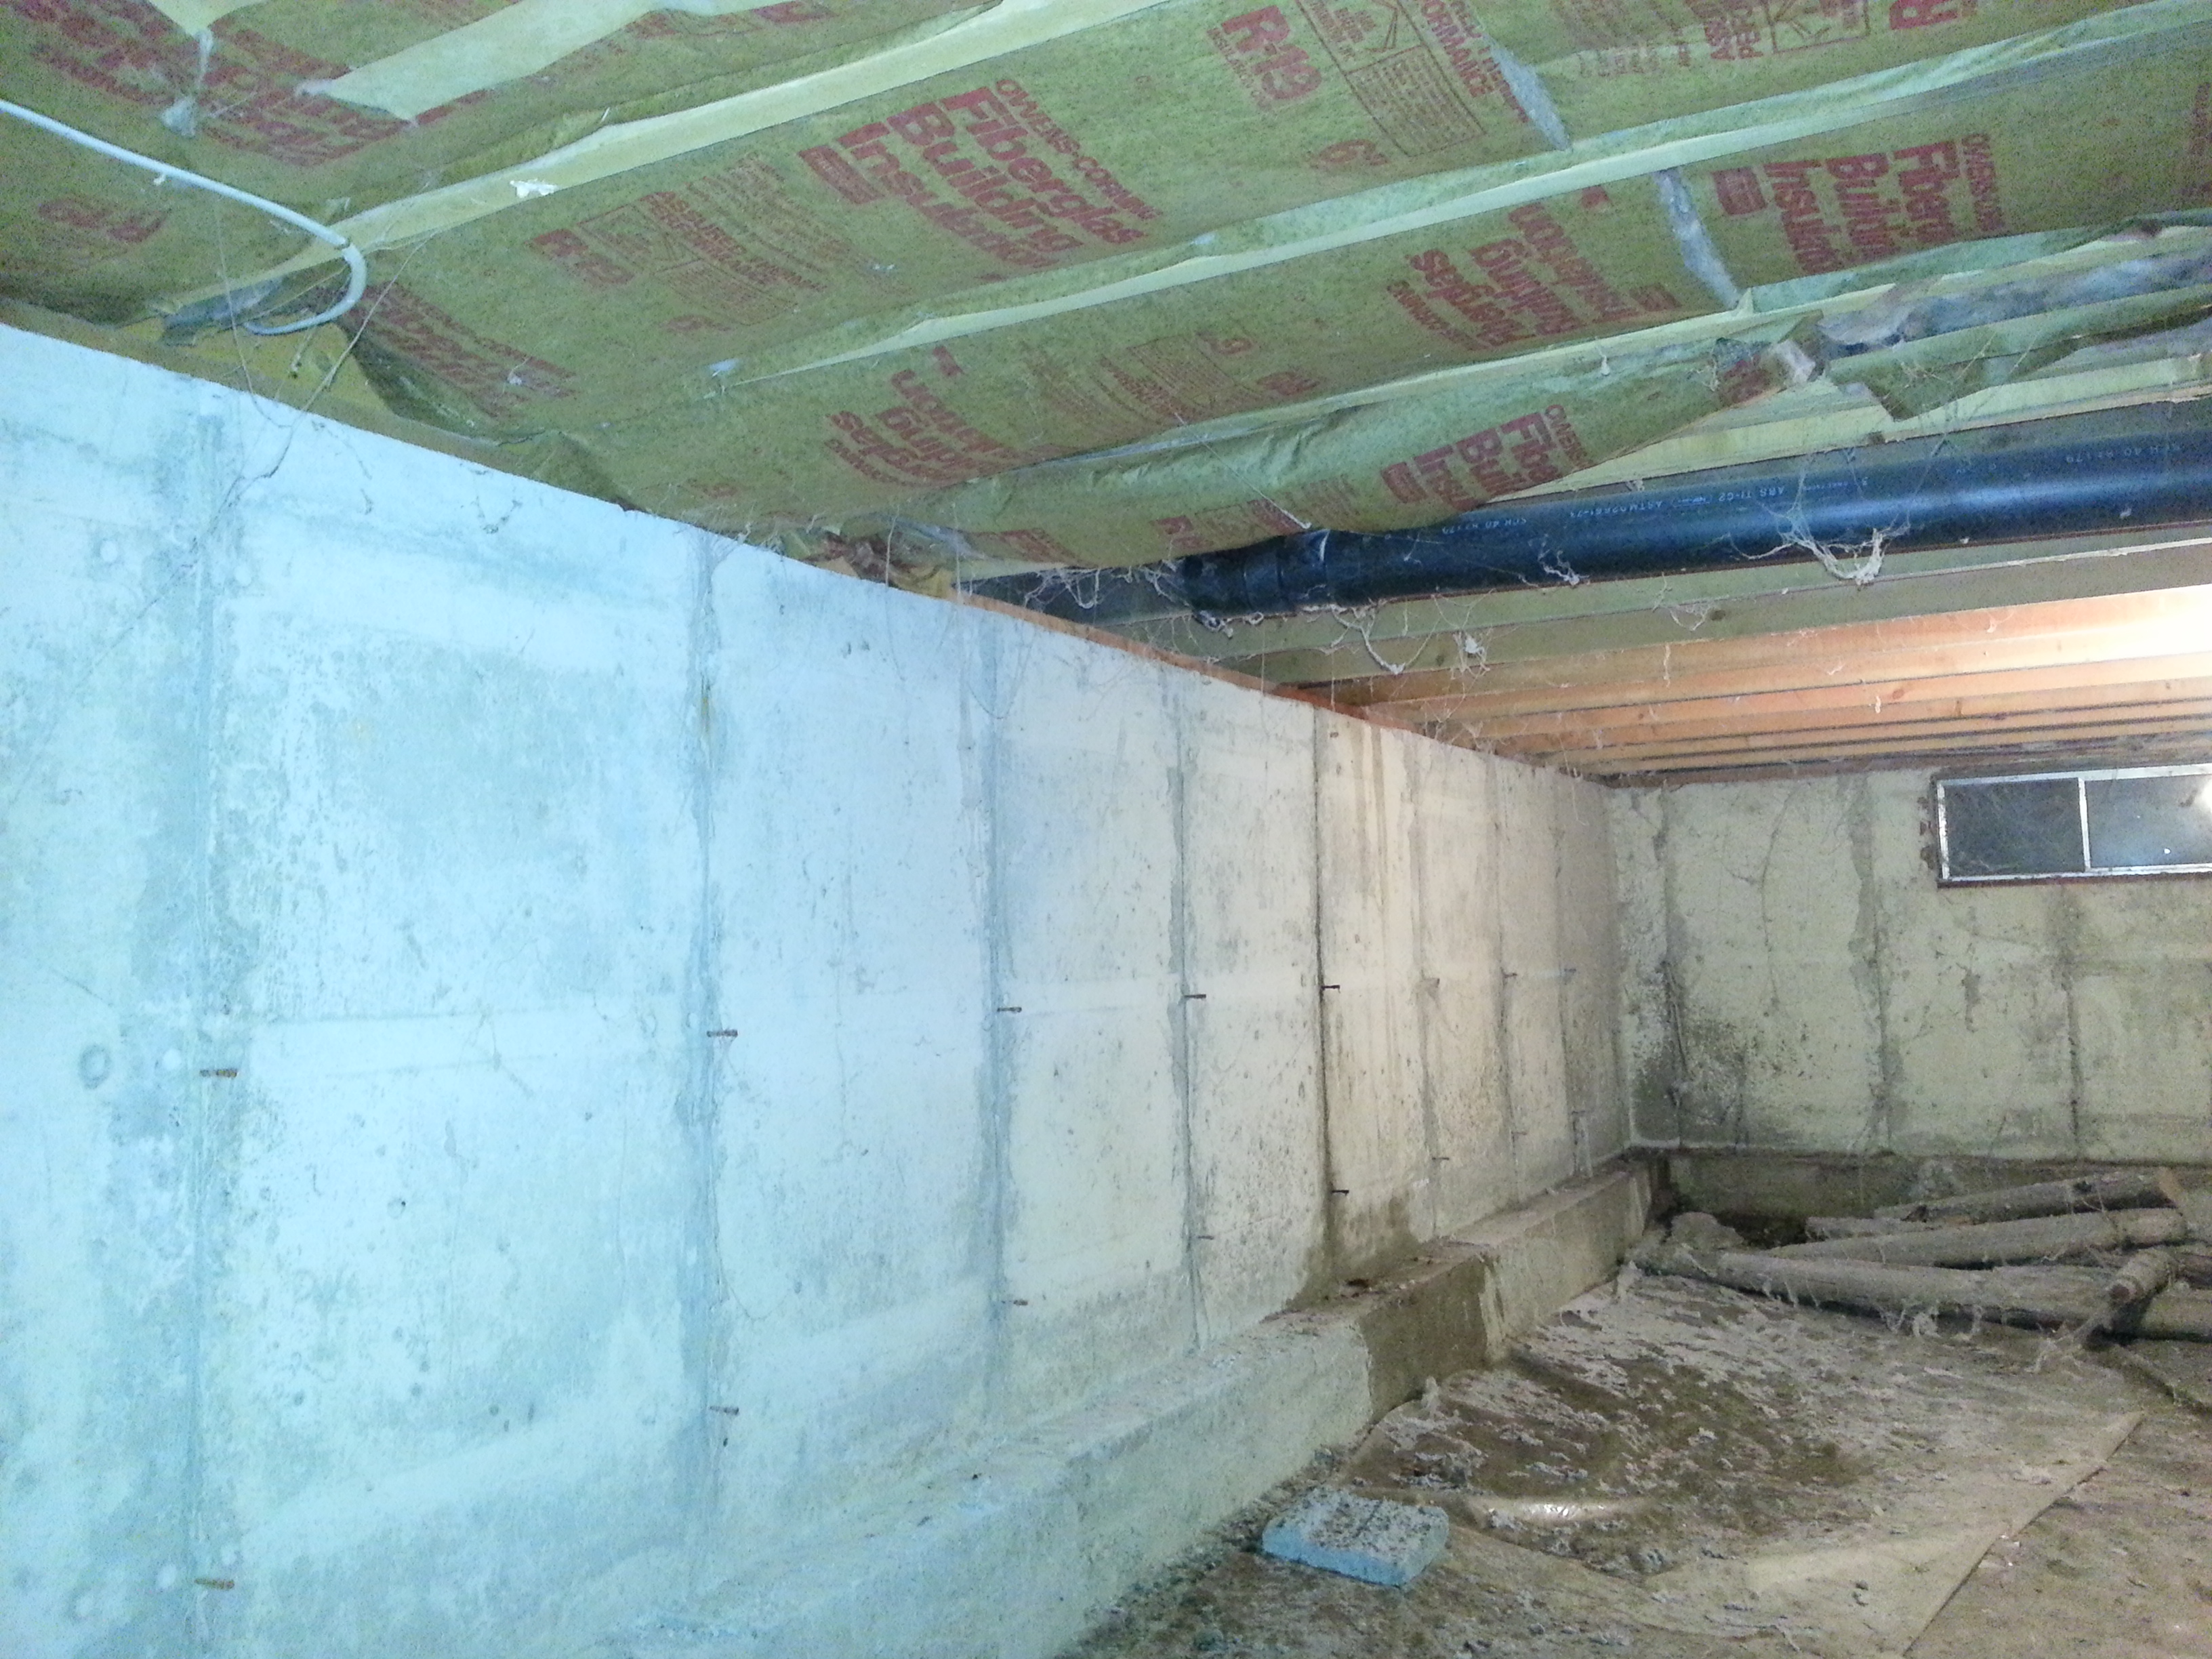
This is what our crawlspace looks like. The stuff just overhead is fiberglass insulation under the bedroom floor. On the other side of the black drain pipe is the uninsulated floor of the enclosed porch. On the left is the poured concrete wall of the foundation. The dirt floor once had plastic over it, but I found it bunched up in the corner. Some previous owner had chucked a bunch of stuff down there like bikes, old fence posts, chicken wire…
First order of business, cover the dirt floor. A dirt floor evaporates a huge amount of moisture into the air every day, all day long, and no house can really deal gracefully with that much moisture. I didn’t see indications that the house had been suffering from the uncovered dirt floor, but since we changed the way the house leaks air I think we would have seen problems crop up pretty soon. The other reason to cover the dirt floor first is that you can work in a relatively clean space once you cover the dirt. We bought a couple of rolls of heavy plastic from the hardware store. We could have bought one larger roll, but I was in denial about how much plastic we would need, so ended up having to overlap the sheets and patch in with some garbage bags for the last couple of feet. Planning is not my strong suit.
I don’t much bother about taping the overlap in the plastic. When you’re talking about evaporation, the amount of moisture you stop is exactly proportional to the surface area you cover up. Covering is enough. This isn’t an air leak problem, so sealing my plastic isn’t necessary. It’s not bad to tape up the edges, but I just don’t bother. I’m much more concerned about the plastic staying put. As I said, there once was plastic on the floor of the crawlspace. Then there wasn’t. Now there is plastic again. I want the plastic to stay. The best way to do that is to never, ever go in the crawlspace again. Probably that’s not realistic (we already did go back down there to run the refrigerant line for our heat pump). Next best is to pour a concrete slab over the plastic. That’ll keep the plastic down. Maybe we’ll do that later, once we cut a hatch into the crawlspace from the basement. For the time being I have overlapped the plastic and kind of fastened it around the perimeter. Anyone who goes down there and messes up my plastic is going to get a tongue lashing.

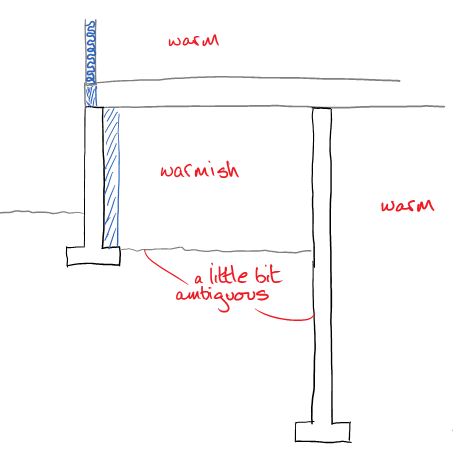
Original condition: the insulation was located in the floor of the bedroom. That left the basement wall exposed to a cold crawlspace and the plumbing mostly unprotected.
Next step, decide where the thermal boundary will be located. This is mostly a geometry challenge. Some of the crawlspace’s surfaces lose heat in a bad way, some lose heat and it’s not so bad. For each surface we have to decide whether we want the space on one side to be thermally separate from the space on the other side. These are the surfaces
- Between the crawlspace and the outside
- Between the crawlspace and the ground
- Between the crawlspace and the porch
- Between the crawlspace and the bedroom
- Between the crawlspace and the basement
As you can see from the photo of the original condition of the crawlspace, someone at some time had decided that the bedroom should be thermally separated from the crawlspace and that the crawlspace would not be thermally separated from the outdoors. Hence, crawlspace = cold. I made a different decision. Here’s why
- There’s plumbing in the crawlspace from the en suite bathroom
- Some day I hope to turn the back porch into a kitchen
- If the crawlspace is warm, then I don’t have to insulate or air seal the wall between the basement and the crawlspace
- I want to put a wood shed where the entrance to the crawlspace is
- Nik wants to use the crawlspace for storage (only after putting a concrete slab on the floor!)
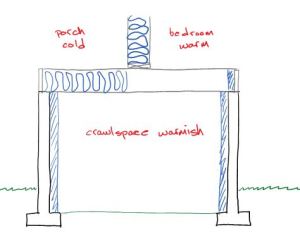
With the crawlspace trying to hold on to heat, the floor of the porch was a thermal hole. Insulation from the bedroom floor was salvaged and installed in the porch floor to keep the crawlspace warm(ish).

This strategy had the strange outcome that I removed the fiberglass insulation from the bedroom floor and put it in the floor of the porch, with some additional foam board insulation underneath. The walls between the crawlspace and the outdoors are insulated, everything else is adjacent to spaces that are inside the house, with the exception of the porch, therefore the porch floor gets insulated. I started with the intention of building a wall between the part of the crawlspace under the bedroom and the part under the porch so I wouldn’t have to insulate the porch floor. But I quickly abandoned that after puzzling through how to build that wall. And by doing so I avoided having to insulate the wall between the basement and the space under the porch.
I thought the crawlspace should be insulated, which theoretically makes the insulation in the floor of the bedroom unnecessary and puts the plumbing in a warm space.
Nik probably thinks I made a wrong decision about where to put the insulation. I’m willing to concede that our bedroom might have gotten a bit colder, and the water in the bathroom takes longer to run hot with this approach. But I think ultimately we’ve gotten closer to what we want for the house by doing it this way.
Next, insulate the crawlspace walls. I used the same insulation that we used in the basement: 6″ boards of low density expanded polystyrene (EPS). I glued the boards to the concrete walls using polyurethane adhesive spray foam. I trapped the perimeter of the plastic sheet behind the bottom of the foam board, which does the main work of keeping the plastic in place. The perimeter of the framed floor, the “band joist”, was sealed and rectangles of foam board fitted between the joists to insulate the 10″ between the top of the foundation wall and the underside of the floor.
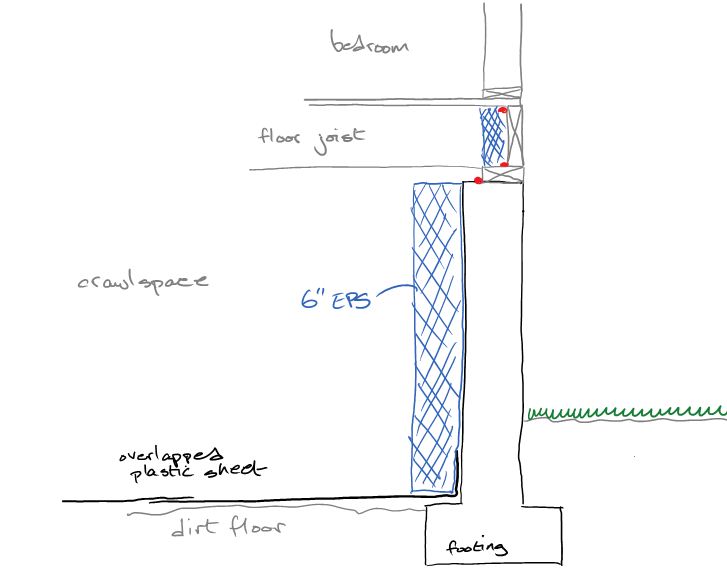
The plastic on the floor of the crawlspace is tucked behind the insulation on the crawlspace walls. Junctures between the framing are sealed to keep air from leaking in. Don’t forget to insulate the perimeter of the framed floor.
I insulated the porch floor to knock down heat loss from the crawlspace to the porch. Nik sealed up holes between the basement and the crawlspace, which undoubtedly keeps the basement warmer, but which I wouldn’t have done because it doesn’t fit with the geometry of my thermal enclosure. Nik also thinks the cold floor of the crawlspace, within about 12″ of the outside grade, is a big heat loser out of the crawlspace. It would have been nice to insulate the floor, but with the irregular dirt floor I couldn’t think of an easy was to do it, so I didn’t. Lastly, I cut a piece of foam to fit in the door into the crawlspace from the backyard. It’s not sealed in place so we can still get in there, and that’s probably the biggest weakness in the whole system.

“A tongue lashing” haha! You sound just like your mother! Good entry, though.
By: Jessica Ponzio on December 22, 2013
at 2:24 pm
[…] particular duct connects to crawlspace below the master suite addition. When we insulated the crawl space, I sealed up the bottom of the duct, but forgot to address the area behind the […]
By: You know it’s cold when | Energy Freak Show on January 8, 2014
at 10:08 am